A Personal Trainer Website is a Must Have for Online Personal Trainers
A website and online presence is crucial for any business today. This is especially true for the online personal trainer. This blog will show you all the steps needed to create your own personal trainer website.
Remember – Before you start making a website, make sure you have done all the things we advise in the first three blogs in this series. Once you start working with clients and handling day to day business tasks, it is very difficult to go back and setup the foundations of your business.
HOT TIP: Allow about three to four days to get your website made. Even using an all in one hosting service, it can take a lot of time laying out pages and writing text.
Starting your online personal training business blog series
- How To Start Your Online Personal Training Business #1
- Personal Training Business Setup – First Steps #2
- Online Personal Trainer Management Tools – #3
- How To Make Your Personal Trainer Website #4 – Current blog
- How To Find Your Personals Trainer Niche #5
- Making Your Unique Selling Proposition for Fitness #6
- Online Personal Training Prices: How to Set Them #7
- How to Make Your Online Personal training package prices #8
- Making Personal Training Templates #9
- The Personal Training Business Opening #10 – End of Series
Don’t want to scroll? Click a section to go right to it.
Step 1 - Choose your Personal Trainer Domain name
A domain name is your internet address. It is usually the name of your business. In our case it is TotalPTFitness. What makes it a domain is the http and the .com or .net at the end.
You can buy a domain name from companies like HostGator, Name Cheap, Google Domain, Hover and others. When comparing companies, keep a watch for hidden fees, transfer costs, extra add on fees or privacy fees. (*but don’t buy anything until you read about logos and hosting in steps 3 and 6)
If you already have a business name like Tim Holt Personal Training, then you try to buy TimHoltPersonalTraining.com and you’re all set. But if yours is already taken or you need to create one, take time and put some creative thought into creating a new one. For example PersonalTrainingByTimHolt.com.

Here are some tips and guidelines for choosing domains.
- Try to stick with .com
- Avoid hyphens, underscores, special characters and numbers. You will always be explaining how to spell them. Like Tim_Holt*Training.com or TimHoltPersonalTrainer6.com.
- Usually avoid made up names like BodiTrax. It may look slick, but will always need explaining.
- Do some internet searches on your potential ideas to get an idea of what is available. Avoid names that may be similar to potential competitors.
Brain storm and come up with your best three. Then start asking friends and family what they think. Find out why they like one or not like one. Then pick one.
Step 2 - Personal Trainer Website Business Logo
A logo is the symbol for your service and your business. Customers will identify with your logo. And as petty as it seems, a poorly designed and amateurish looking logo can discourage customers from using you. It is an unconscious thing. But your personal trainer website is promoting your professional services and if the brain sees a graphic that looks like a child scribbled it, conflict is created.
As you are creating your business name, hire a professional service to create a clean, solid logo. Consider Designcrowd or Fiverr. Both will give you access to many talented freelance graphic artists.


Here is some advice on working on your logo.
- Provide clear direction to the designers about color scheme, fonts, etc. Make sure logo looks good in color and black and white. Those two sites have guidelines to help you in the process.
- Stick with a horizontal format. It will fit better on letterhead, business cards, websites and works well with phone browsers.
- Choose a few designs and get feedback from friends and family.
- When you do choose the designer, various layouts in color and black and white. Get files of all of them in ai, png, bmp and jpeg. (AI is helpful if you ever need another artist to revise them. PNG allows you to make the backgrounds transparent and they are fast to load on websites.)
Step 3 - Choose a Hosting Service for Your Personal Training Website

Your personal trainer web site needs a place to “live” and store information. We advise finding a web hosting company that does everything for you. Some web hosting companies provide the domain name for no charge. This is why it is smart to wait and see who you will use for web hosting before buying your domain name.
Try to use a hosting service that will provide you email addresses. Jake426@gmail.com is not as professional as Jake@JakesPersonalTraining.com
When comparing prices, consider all the things you can get. Unlimited bandwidth is a good feature to get upfront. It might not be needed at first, but does allow for growth. Avoid signing up for upgrade features that are not needed. They can always be added later if needed. We suggest HostGator. They are affordable, will help you set up everything and let you add features as you need them.
Step 4 - Setup Your Website Manager
OK, domain? Check. Host? Check. Now it is time to get the program to make the website. It is called a content management system (CMS). There are many options. The most common is WordPress.org and we highly recommend it (not wordpress.com which is for blogging).
WordPress is fairly easy to use, has lots of free plug-ins (mini programs that can do different jobs). Most of the hosting companies can help get it installed and even provide a ready to go website theme.
In the previous blog on tools we advised Elementor because it is so versatile, works with WordPress, has many tools and gives you total control over page layouts. Plus it includes many themes. Consider adding it if the basic tools of WordPress are not working for you.

Professional Software for Personal Trainers and Wellness Professionals
Video exercise, fitness testing, nutrition counseling and phone app for clients
Step 5 - Website Themes
A theme is just a pre-made website layout. Themes are designed to keep a consistent style of your website. Themes handle all the color, type fonts, layouts and more. Using a pre-made theme is the way to go. But which theme, there are thousands? Take time to look them over and pick a theme that is unique, reflects a professional image and is related to your business. Look at other personal trainer websites to get ideas.

Step 6 - Photography and Images for Your Website
When it comes to adding photos and other graphics to your website, use only professional photos. Don’t use a stock photo of some random model of a generic trainer. Your personal trainer website home page should have photos of you working with a client. It might have photos of clients that match the types of clients you work with. Find a friend that has talent behind the camera or better yet, hire a professional photographer.
Photos should be made with good lighting, high resolution and proper composition. They should show your personality! They should not just be a snapshot using your phone.
The same with graphics. Hire a pro. The person who makes your logo can also usually create graphics and other icons you may need.

Step 7 - Website Architecture
The business website must have a minimum of 4 pages. A Home Page, an About Us Page, a Services/Pricing Page and a Contact page.
The Home Page does two main things
A) It is the first thing people see. It must instantly let the visitor know what you do and what you offer. In your case, online personal trainer services.
B) It should let the customer know just where to go to find what they need. In your case, how to find more detailed information on who you are, what type client you train, your services and your training packages and prices.
TIP: It doesn’t hurt to convey a professional business appearance, provide testimonials and a call to action.
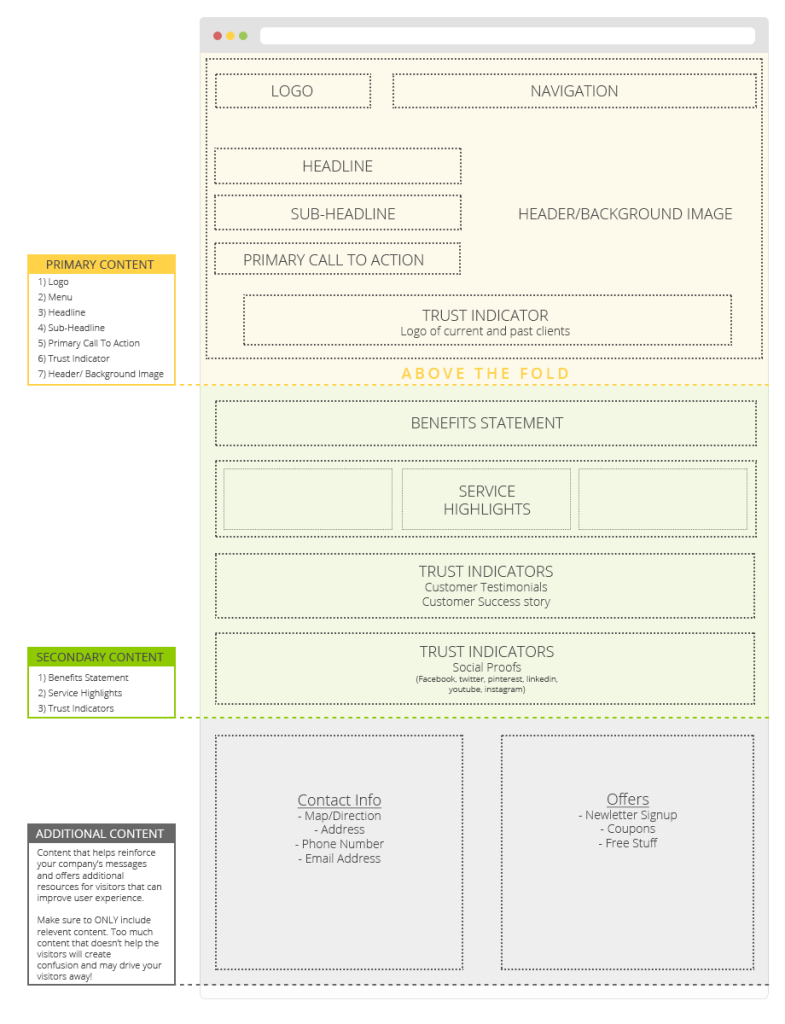
This graphic is one of many sample layouts for a home page, from Website Expert Builder on How to Design a Home Page.

The About Page is not about you
Contrary to what you may think, this page is not used to tell your life story. It is used to tell potential customers about your special skills and how those skills can help them. This is the place to describe your niche in the personal trainer world and why you are the best for what they need.
The Services and Pricing page needs to be clear
While it is self explanatory, it is an important page. You must have clear pricing and packages. What services are offered. What are the prices? How do you provide the services?
How can the customer sign up? It needs a call to action area to encourage a customer to either contact you or sign up for your services.
More details on pricing and special pricing will be discussed in a future blog. Testimonials are a must have on this page.
The Contact Page – simple and basic
Nothing special here. It’s up to you what you want to provide here, even if it is just an email. But not having a way for a potential customer to contact you is a great way to lose business leads and decrease your credibility.
Social media links and maybe a photo of yourself with a few more testimonials is fine here.
Plug-ins and Final Tips
Plug ins are small mini tools designed to help perform some tasks on the website automatically. For example a way to have customers request more information, receive payments, allow customers to share your website on social media and similar type things. WordPress and Elementor offer many simple to use options.
When you get into SEO (making sure our website shows up when people search for your services), Yoast is a nice plugin. We will have a seperate blog in the future discussing SEO and how it works.
Eventually, you will want a blog page for your personal trainer website. Blogs can be a great way to encourage incoming traffic to your website. More on that will be covered in a future blog.
After you finish your website, you want to look it over and make sure it is doing what you want. Specifically, your end product is a website that funnels potential customers from your home page to your price page and then letting them easily sign up and give you money.

Your Personal Trainer Website will pay for itself
Making a personal trainer website for your business can take some time. It certainly will take some effort. And it will require you to put up some money. But, if you follow our direction and tips, it will pay for itself many times over.
When your website is set up, it’s time to set up your niche in The Personal Training Niche – How To Find Your Special Market
Total PT Fitness Online – The Perfect Software for Handling Client Fitness Programs